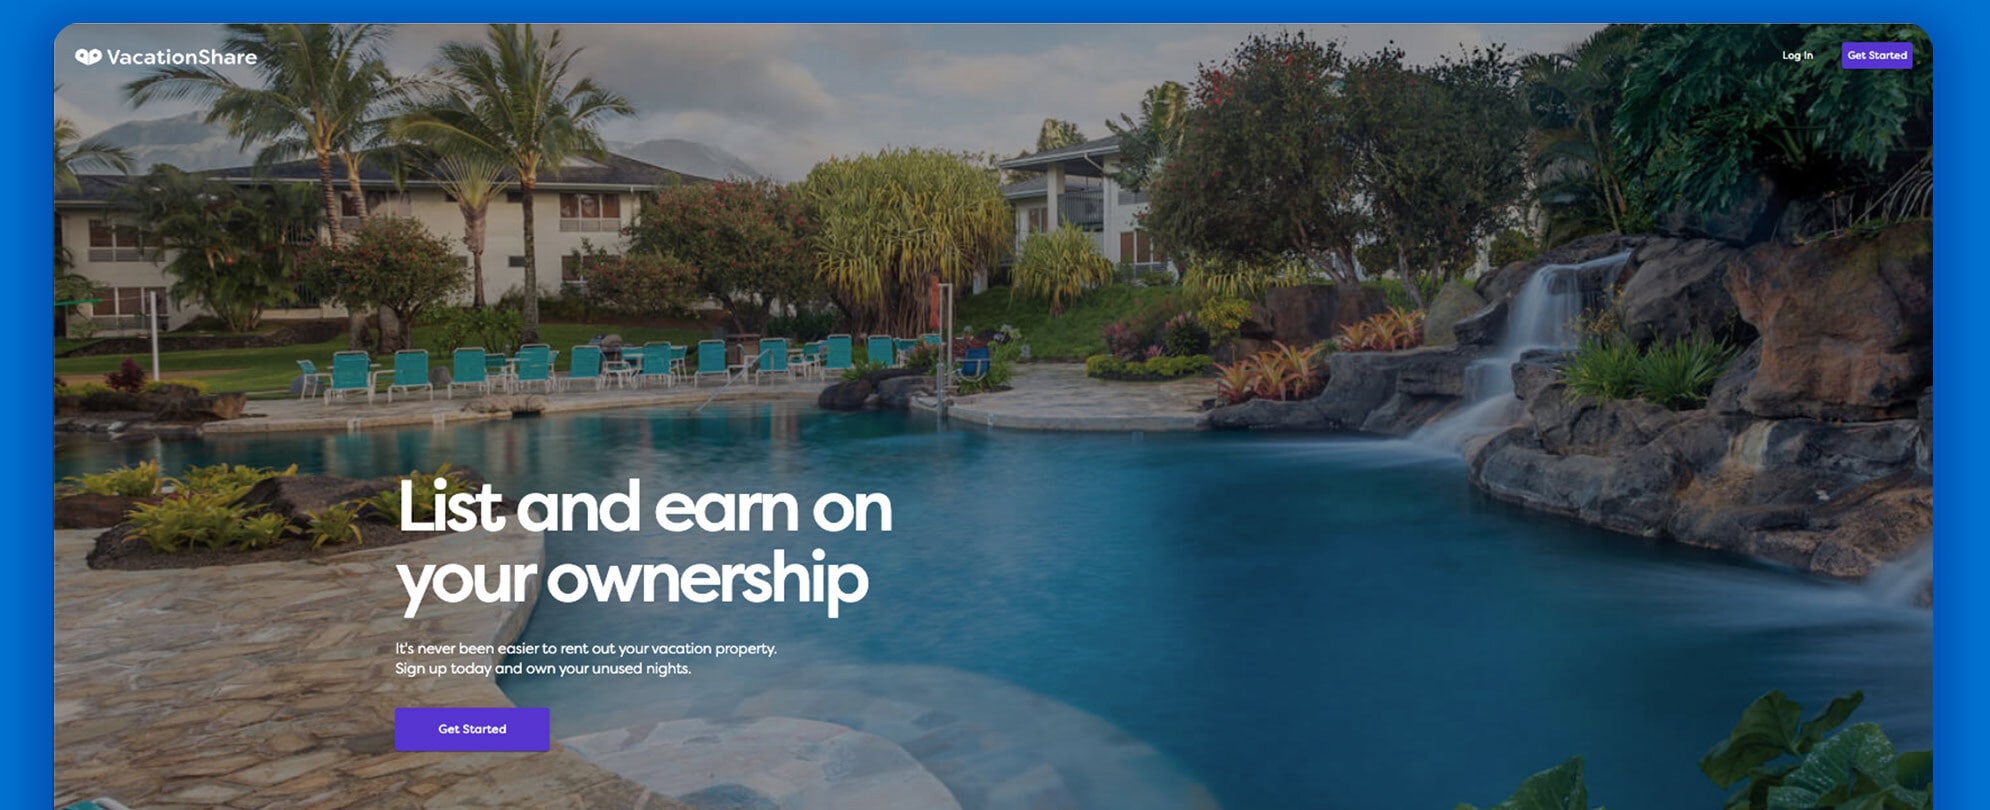
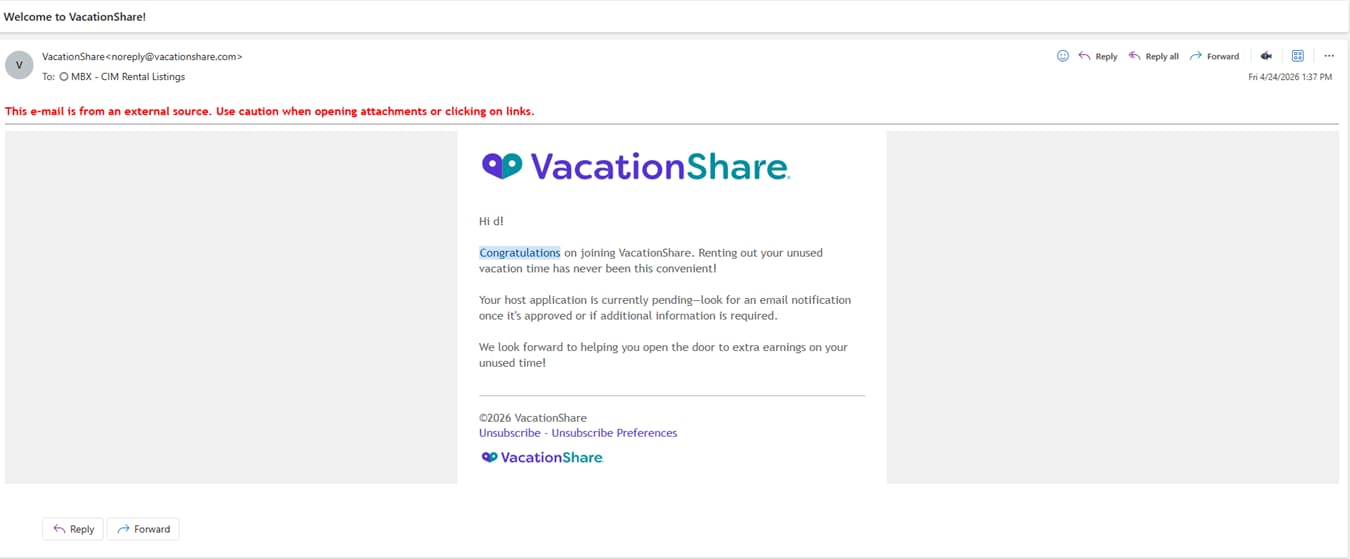
VacationShare is an online platform that offers you the option to rent out your unused vacation time. If you’ve got a vacation booked that you can’t use, you can list that vacation for rental through VacationShare. VacationShare will handle the marketing, booking, and payment for your reservation, making it easier than ever to rent out your unused vacation time.
For more information on how to register for and use the VacationShare platform, just follow these simple steps.
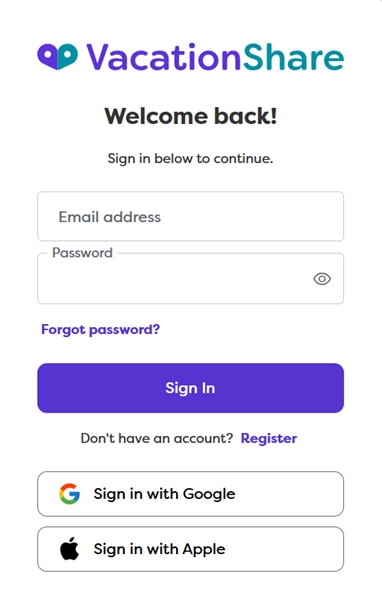
Go to www.vacationshare.com and log in with your email and password.
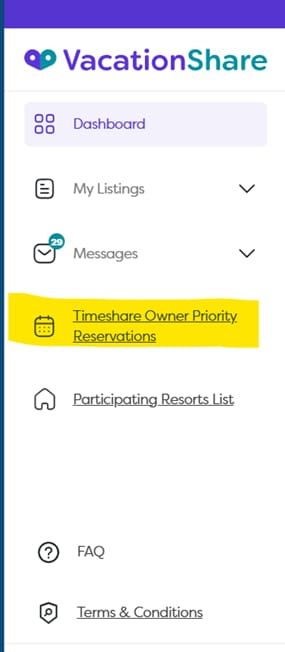
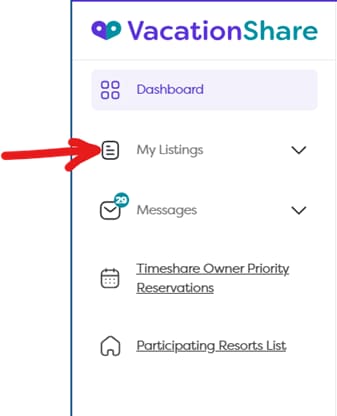
Once logged in, you'll see the "My Listings" page. On the left menu, click on "Timeshare Owner Priority Reservations." This shows you which resorts or dates are owner-only and cannot be rented out. In other words, if you see a date or resort marked as owner-only, you cannot list it for rent.
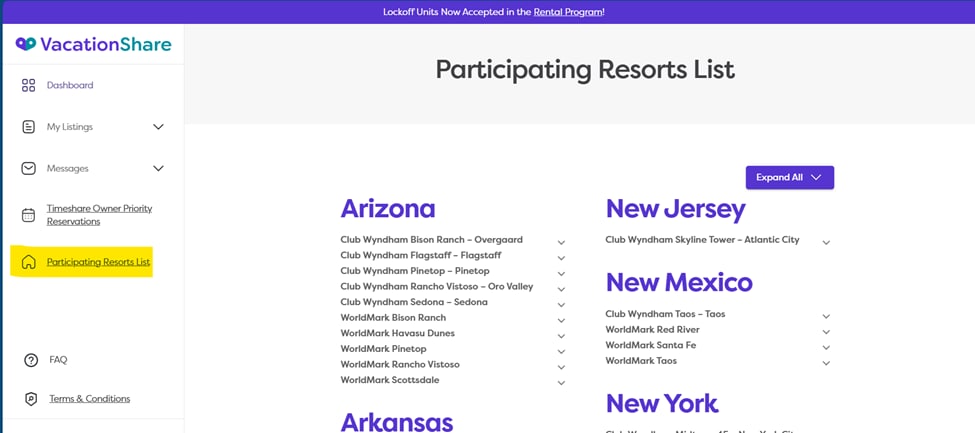
Next, click on the "Participating Resort List" link to see which resorts and unit types you can list. If you have any questions, there’s an FAQ link right there for more info.
When you’re ready, click the "Create Listing" button in the top right corner.

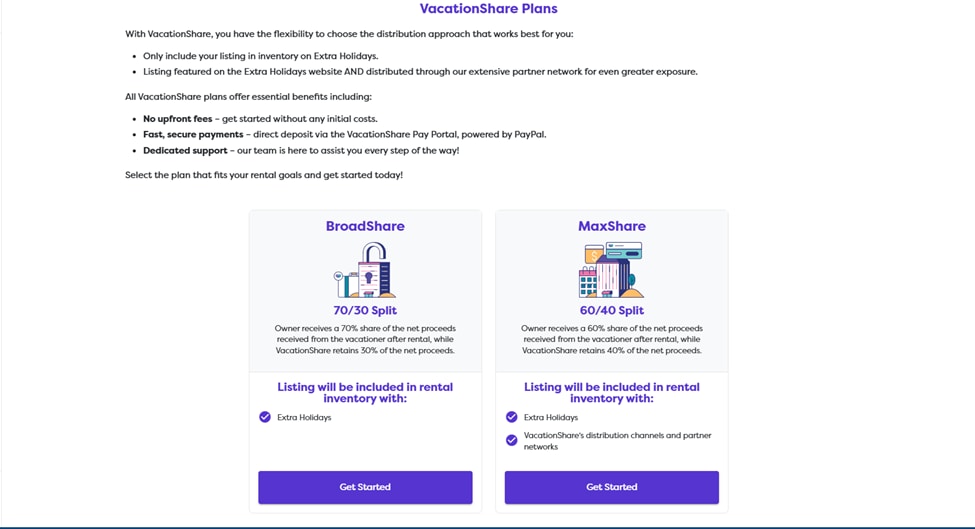
You’ll see two plans: "BroadShare" (you get 70% of the earnings) and "MaxShare" (you get 60% but have broader visibility). Choose the one that works best for you.
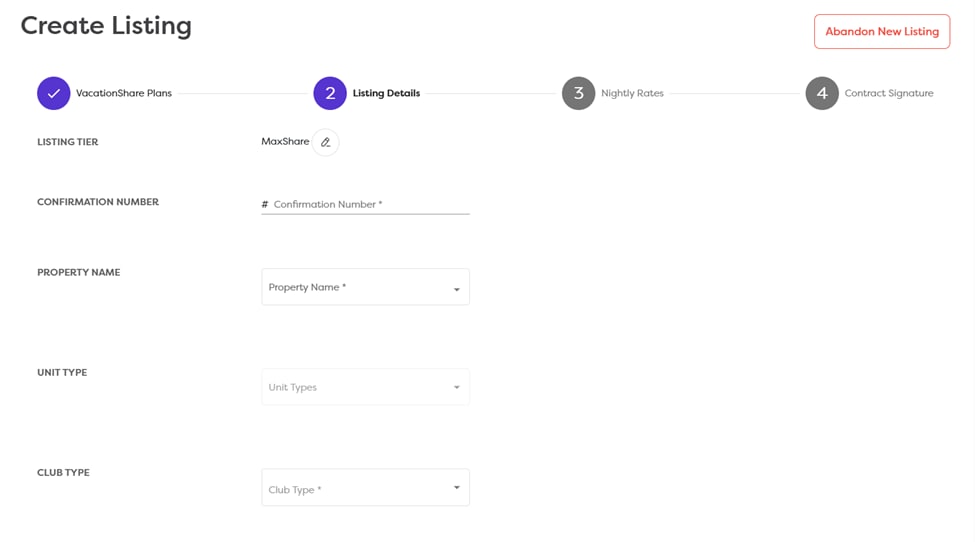
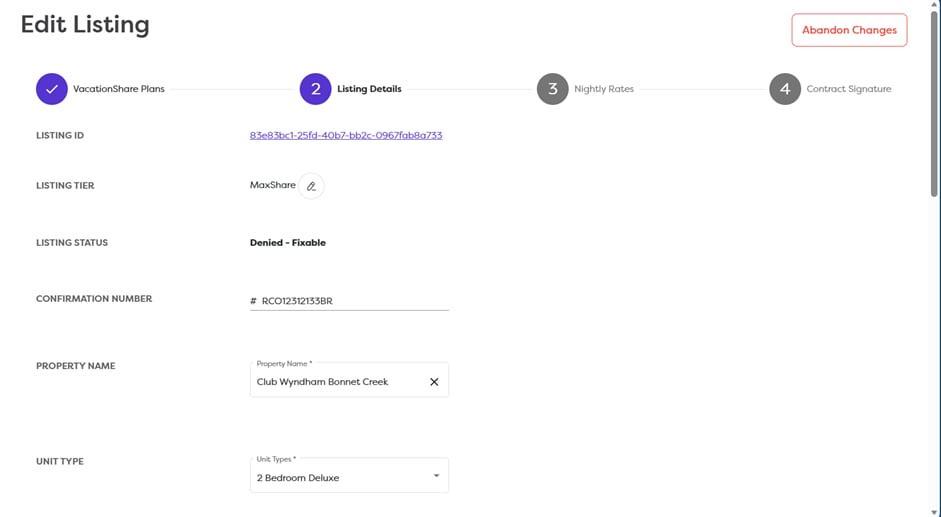
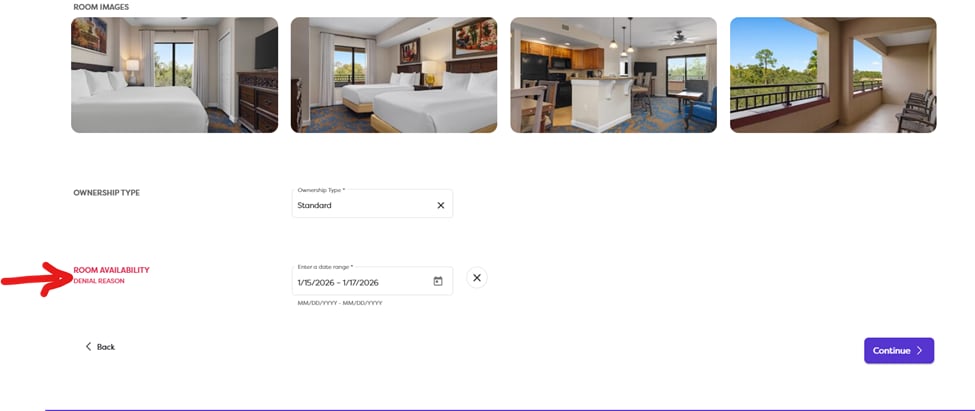
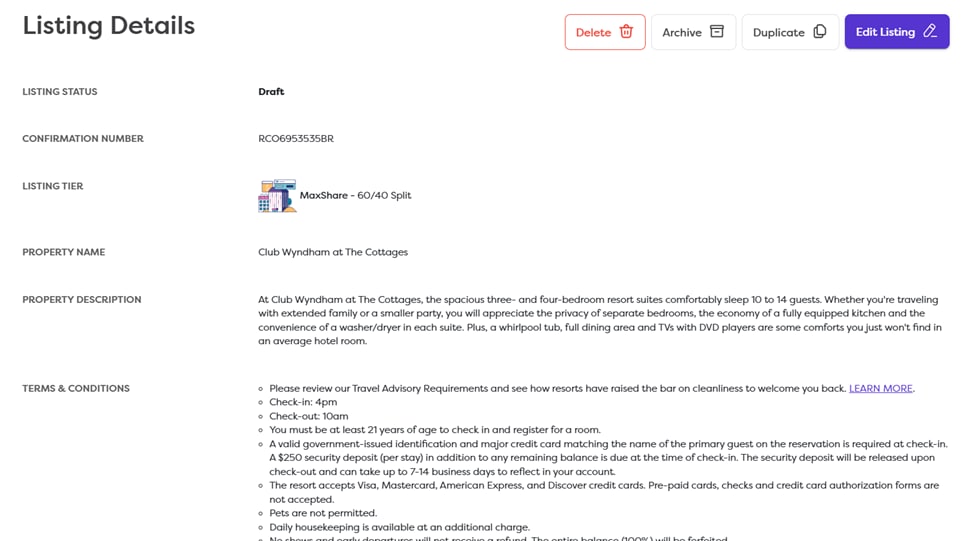
Now enter your reservation details. You must have a confirmed reservation to do this. Fill in the confirmation number, resort name, unit type, club type, ownership type, and the exact dates of your reservation.
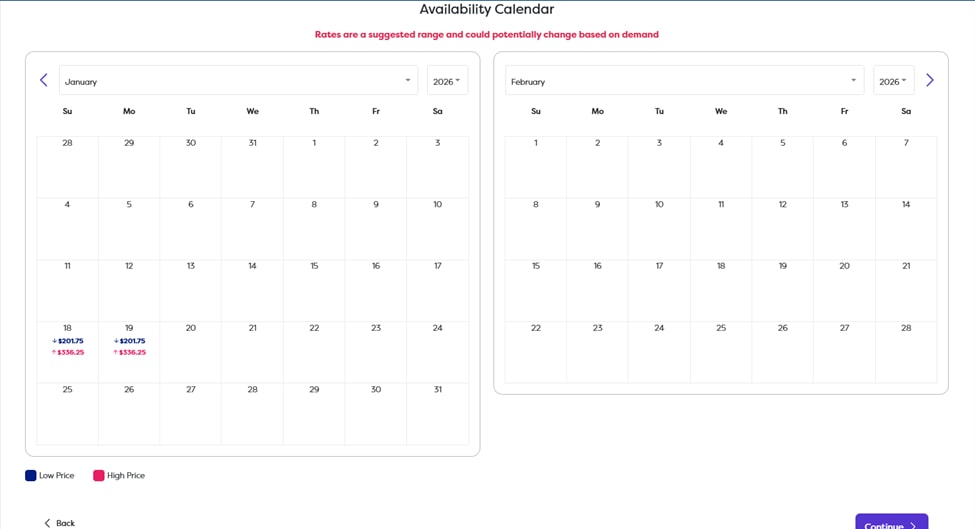
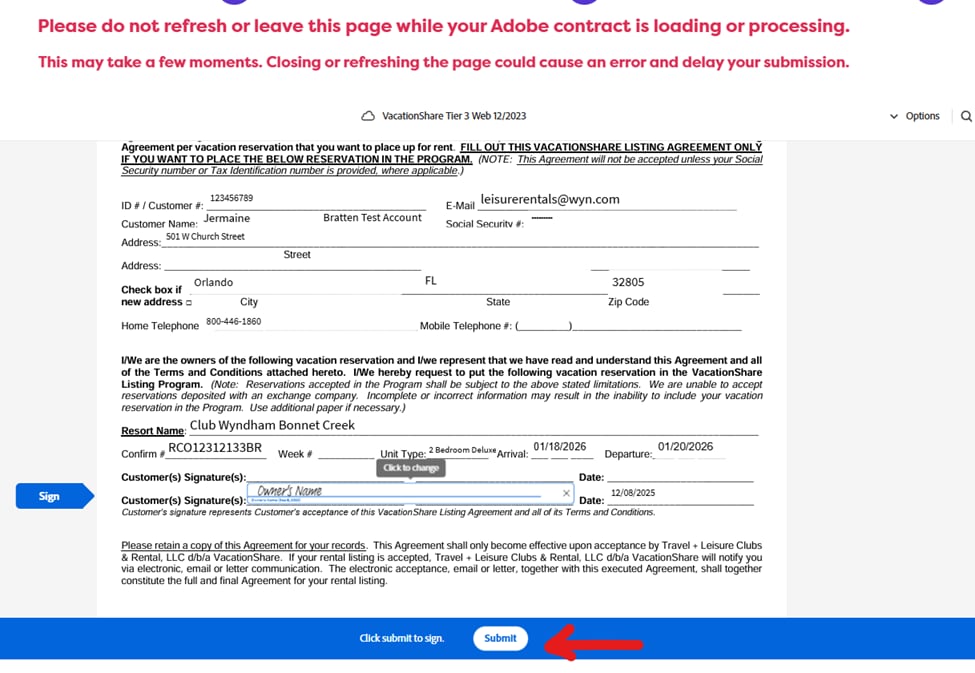
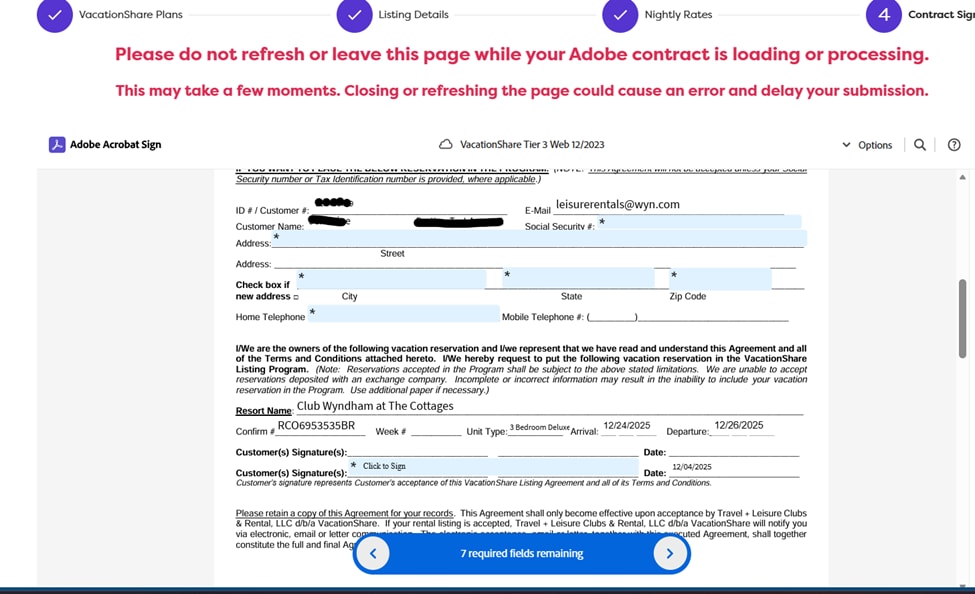
Click "Next" to review the nightly rates—these are set by VacationShare, so no changes needed on your end. Then proceed to the rental contract page. Fill in any fields with an asterisk (*), like your address and phone number. You’ll see a counter that goes down to zero as you fill in all required fields.
Once all fields are complete, click "Submit." You’ll see a "Congratulations" page—just click "OK."

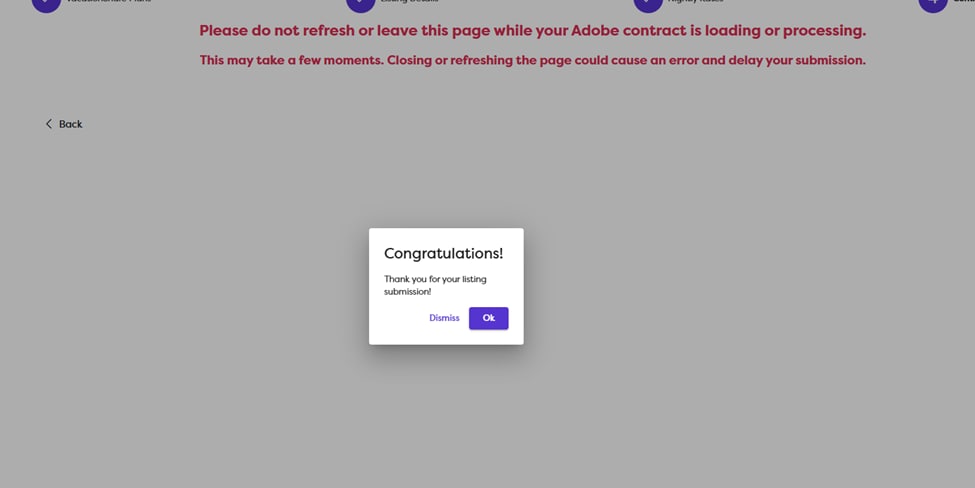
Important: After submitting, do not hit the backspace or back button on your browser. Doing so might cause an error and send the contract back into draft status. Let it process fully, and you’ll be returned to the listing details page with your listing marked as pending.

Your listing will be reviewed by our team in about 5 to 7 business days. If you don’t hear back in that time, feel free to contact us by phone or email for an update.
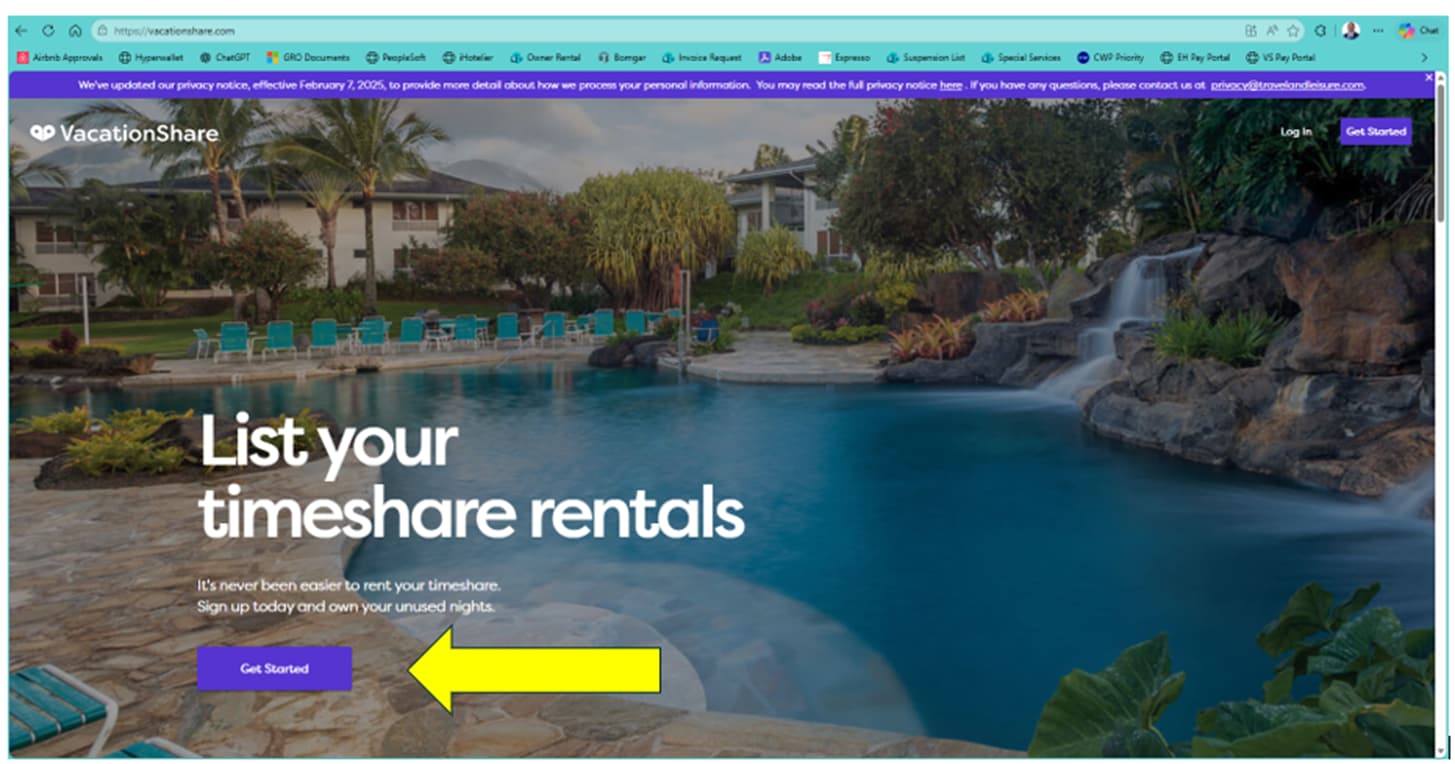
Just open your internet browser and type in www.vacationshare.com. Then click on the button that says "Get Started."
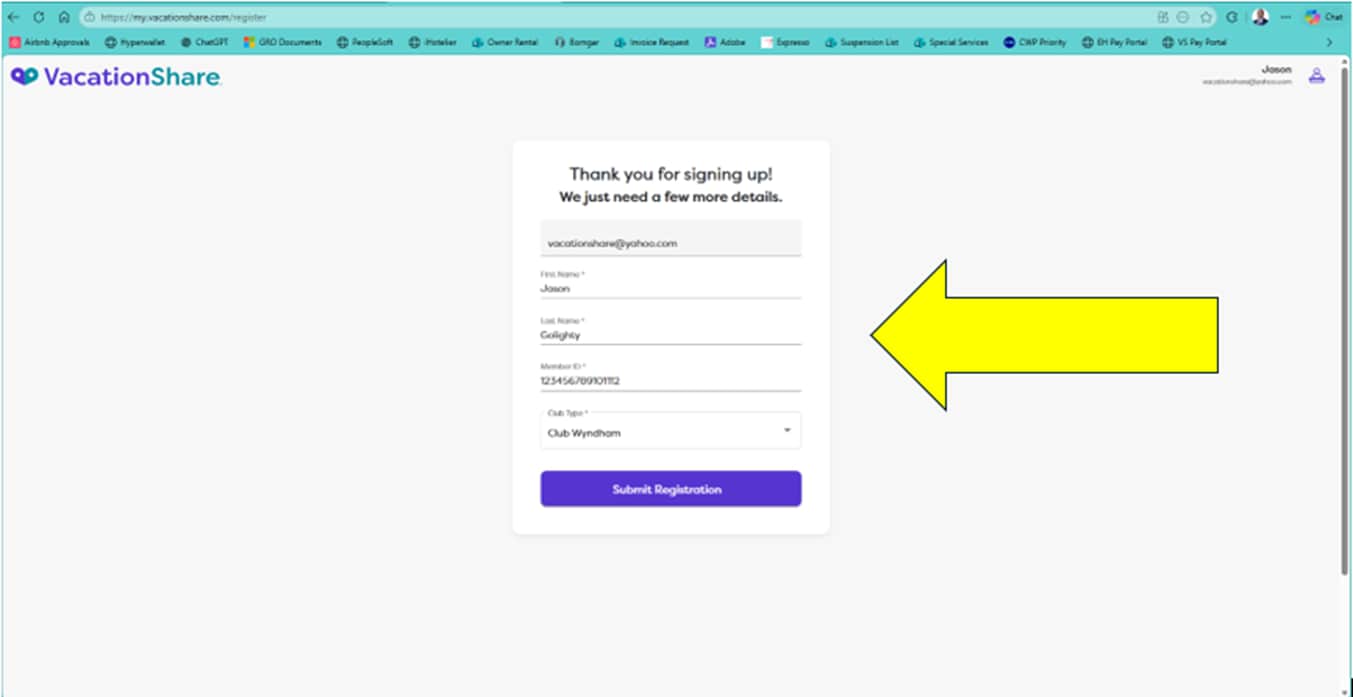
You can sign up with your email and create a password, or you can use a Google or Apple account if that’s easier for you.

Now, type in your ownership details. This means your ID number, your full name exactly as it appears on your official ownership records, and the club you belong to. It’s important to type it just like it is on your paperwork so we can verify you without any delays.
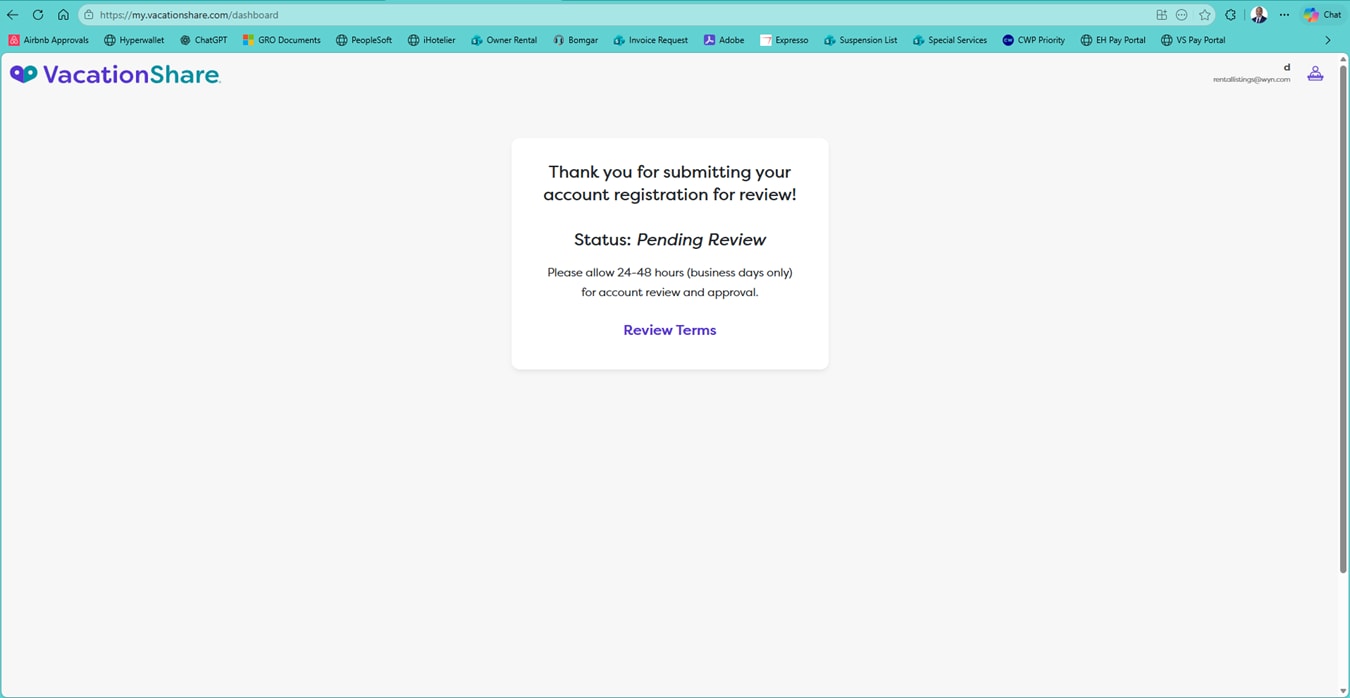
After you sign up, we’ll take a little time (about 48 to 72 hours) to review your details. If everything matches, we’ll confirm your account. If you have any trouble or don’t hear from us in that time, just give us a call at (888) 965-2823 or email info@vacationshare.com. We’re here Monday through Friday, 9 AM to 7 PM Eastern Time.
Go to www.vacationshare.com and log in with your email and password.
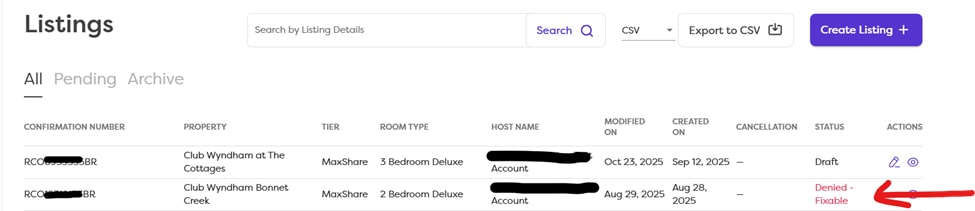
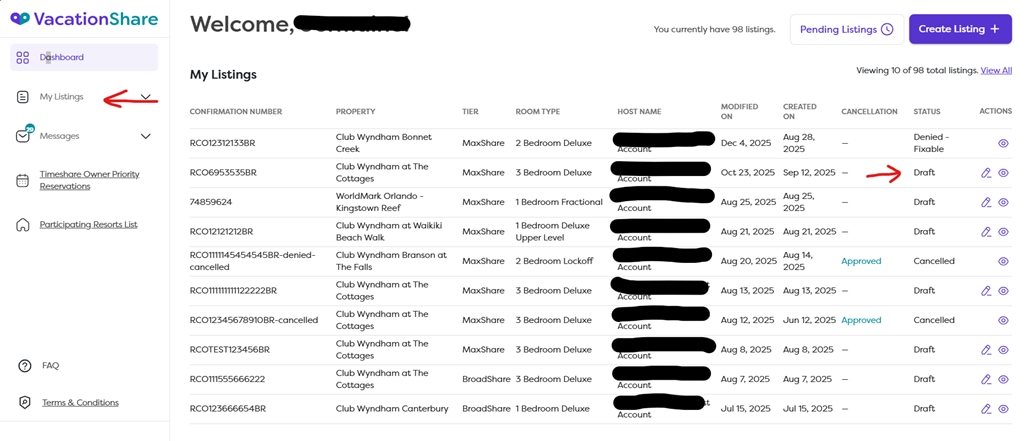
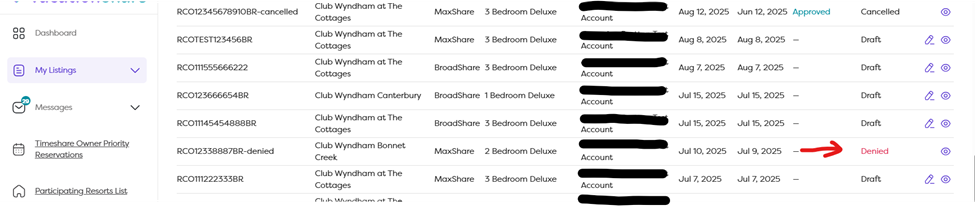
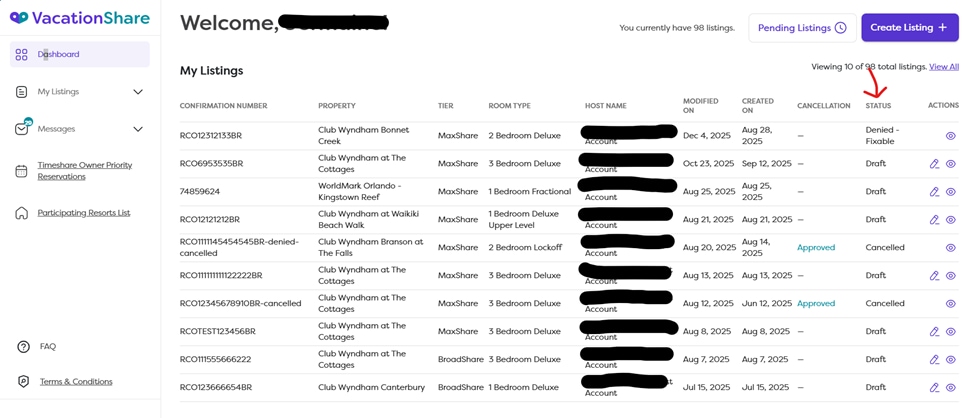
Once logged in, you'll be on the "My Listings" page. Here you can see all your listings and their statuses.
Look for the listing with a status that says "Denied-Fixable." This means you can edit and resubmit it with the correct information. Click on the denied-fixable listing to open its details.
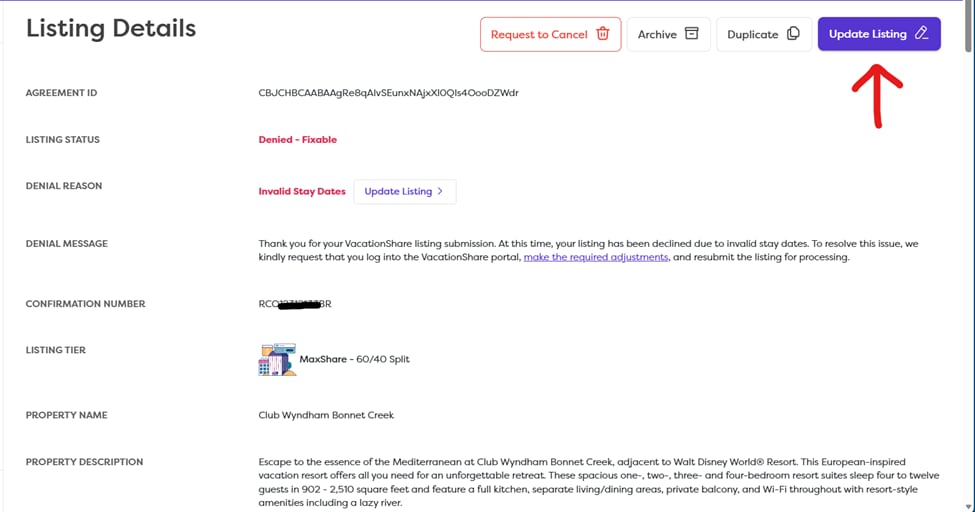
In the top right corner of the listing details page, you’ll see a button that says "Update Listing." Click on "Update Listing" to start the correction process.
You’ll be taken back through the listing process, where you’ll select your plan and enter your reservation details again. This time, you’ll see any errors highlighted in red so you know exactly what needs to be fixed. Just correct those fields.
After fixing the errors, you’ll fill out a new rental contract just like before. The previous contract was canceled out, so this new contract will replace it. Once everything is filled out, click "Submit."
We’ll review the corrected listing and the new contract. Once it’s approved, you’re all set!
Go to www.vacationshare.com and log in with your email and password. Once you log in, you will automatically arrive on the My Listings page.
On the My Listings page, look at the Status column, which is on the right-hand side. Find the listing that shows Draft in the status column. Click on the listing to open it.
Once you click on the draft listing, you will be taken to the Listing Details page.
In the top right corner of the Listing Details page, click Edit Listing. This will take you back into the listing process right where you left off.

Continue through the listing steps, review your details, and proceed to the Contract Signature page. Once you sign and submit the contract, your listing will move out of draft status and be sent to VacationShare for review.
Go to www.vacationshare.com and log in with your email and password. Once you log in, you will automatically arrive on the My Listings page.
On the My Listings page, look for the listing that shows a Denied status. Click on the denied listing to open it.
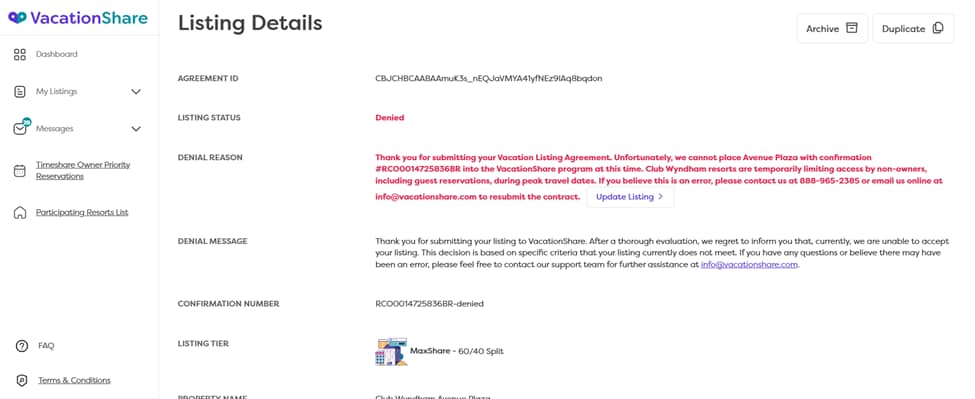
After clicking the listing, you will be taken to the Listing Details page. At the top left corner of this page, you will see the Denial Reason (the heading)
To the right of it, in red, the specific reason the listing was denied.
Directly below that, you will see Denial Message, and the message to the right will explain why the listing could not be accepted.
If this information does not appear, you may contact VacationShare and our team can provide the denial details for you.
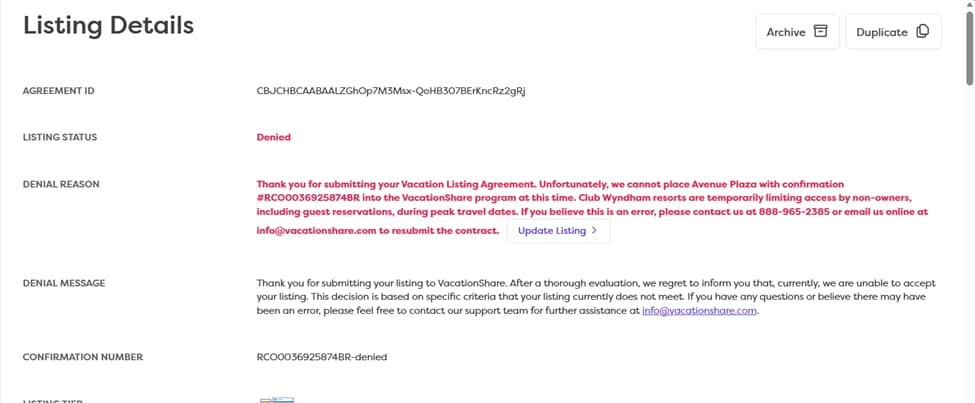
If the denial is fixable, you will see a hyperlink next to the Denial Reason that says Update Listing. This means you have the ability to correct the errors and resubmit the listing.
If you click Update Listing, you will be taken to the next screen where you can edit the listing and correct the issue.
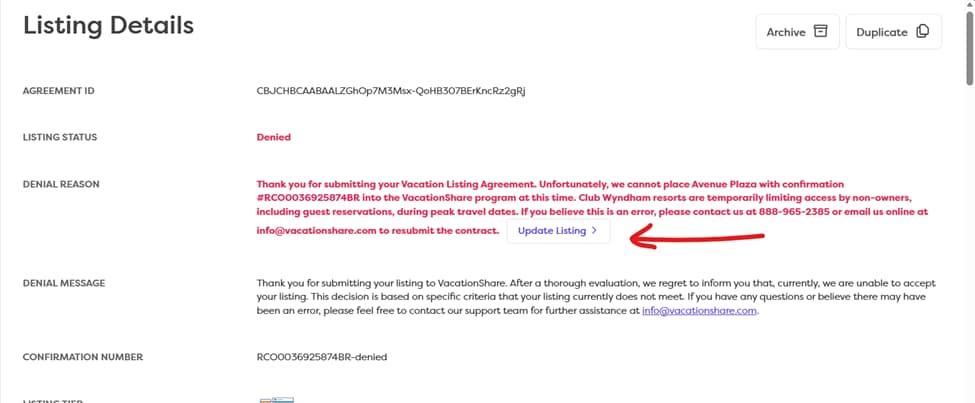
You may also see an Edit Listing button in the top right corner of the Listing Details page. Clicking this option will allow you to correct the errors and submit a new contract as well.
Important Note:
These update options will only appear if the listing is Denied Fixable. If the listing shows as Denied without the option to update, it means it was Denied Flat Out, and the reservation cannot be accepted for rental.
Go to www.vacationshare.com and log in with your email and password. Continue through the listing process as usual.
The zoom tools are located on the Contract Signature page, which is the final step of the listing process.
On the right-hand side of the Contract Signature page, you will see a small button shaped like a paper document with an arrow. Clicking this button will open viewing options that help make the agreement easier to read.
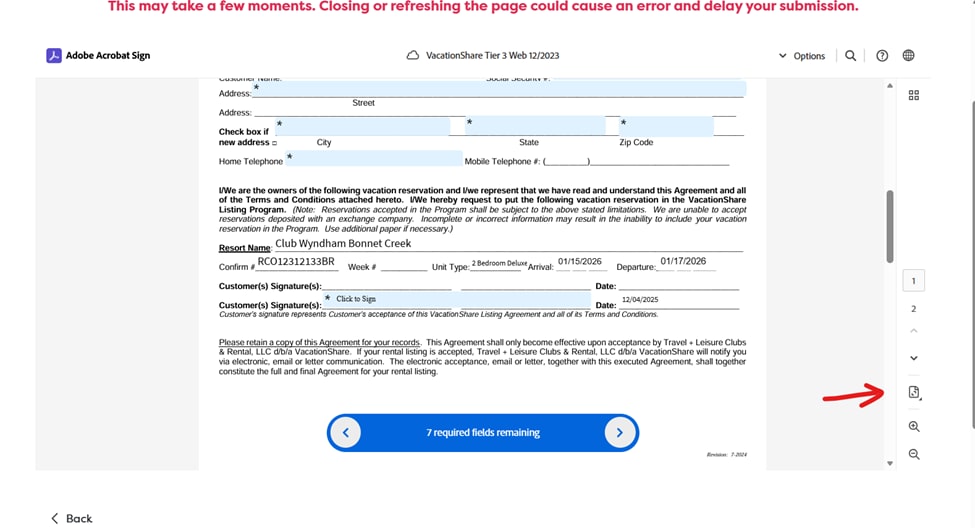
You will see two choices:
Fit One Page: Shrinks or adjusts the page so the entire agreement fits onto one screen.
Fit to Width: Enlarges the agreement so it stretches across the width of your screen, making the text larger and easier to read.
Right below the page view button, you will see two magnifying glass icons:
One has a plus sign (+), one has a minus sign (–)
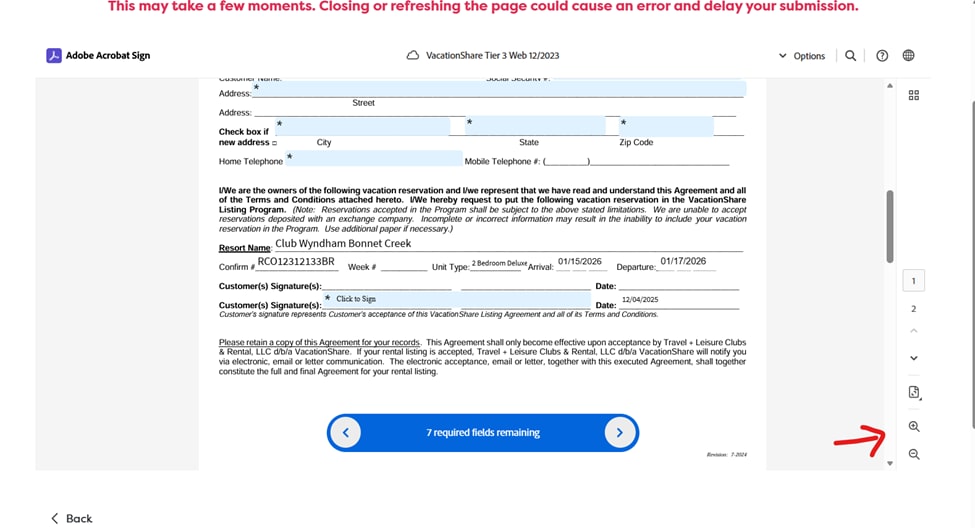
Here’s how they work:
Magnifying Glass with + → Zooms in, making the document and text larger
Magnifying Glass with – → Zooms out, making the document and text smaller
The zoom tool is especially helpful for hosts who may have difficulty reading the small print or fine details in the agreement.
You can click these buttons as many times as needed until the agreement is easy and comfortable for you to read.
Go to www.vacationshare.com and log in with your email and password.
Once you’re logged in, you’ll land on the "My Listings" page. Here, you’ll see all your current listings.

Find the listing you want to archive and click on it to open its details page.
In the top right corner of the listing details page, you’ll see a button labeled "Archive Listing" with a little folder icon next to it. Click on that button.
A pop-up will appear asking if you’re sure you want to archive the listing. Just click "OK" to confirm.
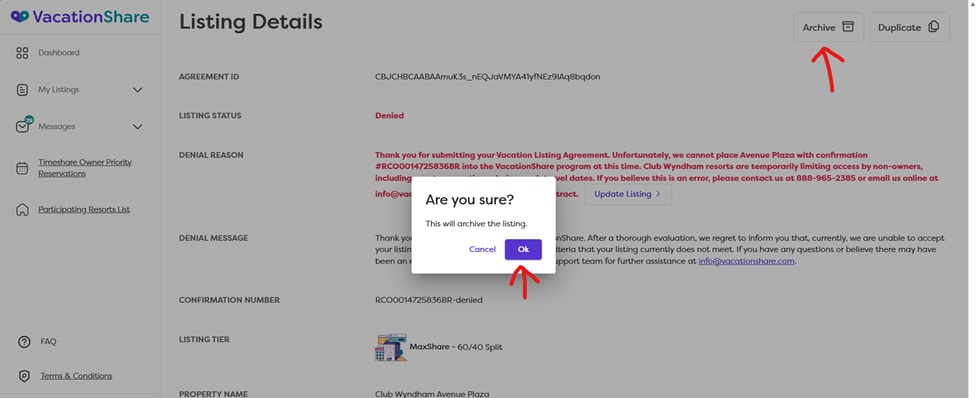
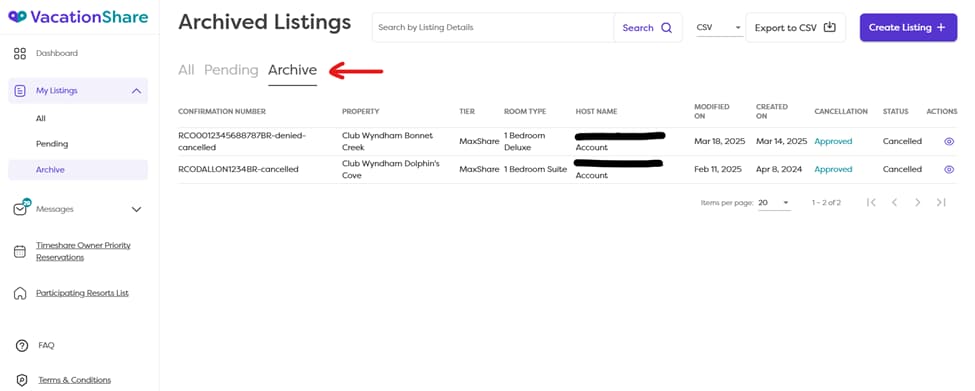
Once the listing is archived, it will be moved to the archive folder. To see your archived listings, go back to the "My Listings" section. On the left-hand side, you’ll see an "Archived" option. Click on "Archived" to view all the listings you’ve archived.
Go to www.vacationshare.com and log in with your email and password.
After logging in, you'll land on the dashboard. Click on "My Listings" to see all your current listings.
Find the specific listing you want to cancel and click on it to open its details page.
In the top right corner of the listing details page, you'll see a red button with a trash can icon that says "Request Cancel." Click on that button.
A pop-up will appear asking if you’re sure you want to cancel the listing. Just click "OK" to confirm.
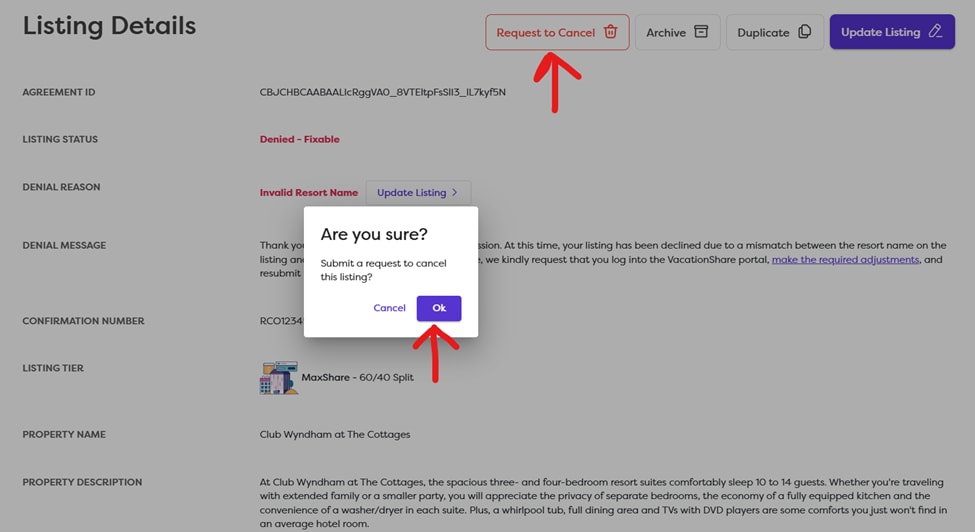
Once you've requested the cancellation, you'll see a message saying "Request Sent." Please allow up to three business days for the cancellation to be processed. If it’s not completed within that time, we recommend giving us a call or sending us an email so we can assist you.
If your cancellation is approved, you’ll need to contact your club to handle the reservation. This is important if you want to get your points or credits back. If you decide you want to keep the reservation and travel yourself, you can do that too. Either way, just let your club know so they can update the reservation status.
Go to www.vacationshare.com and log in with your email and password. Once you log in, you will automatically arrive on the My Listings page.

On the left-hand side of the My Listings page, you will see a dashboard menu. Look for the hyperlink that says Participating Resort List and click on it.

After clicking the link, you will be taken to the Participating Resort List page. Here, you can click the arrow to expand all resorts if you want to view the full list.
This page shows:
All resorts that VacationShare accepts for the rental program.
All unit types at each resort that are eligible for rental.
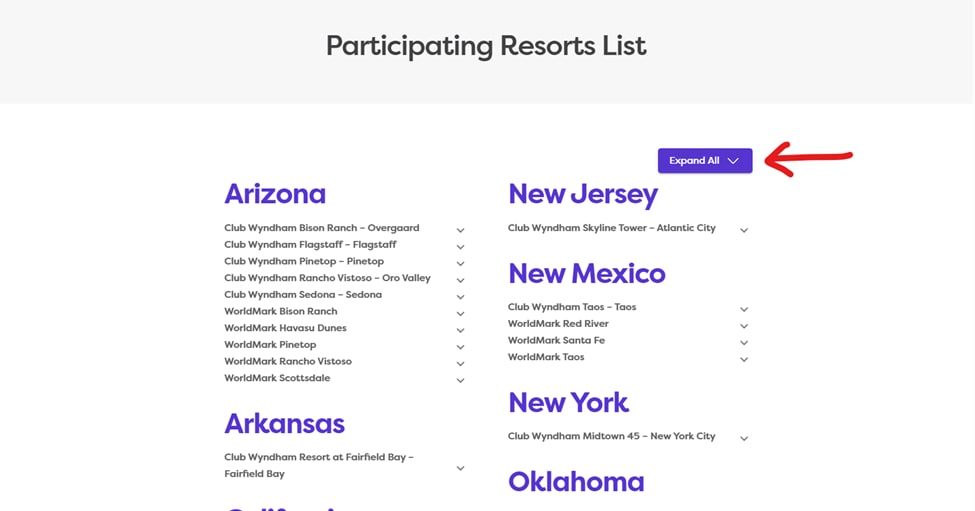
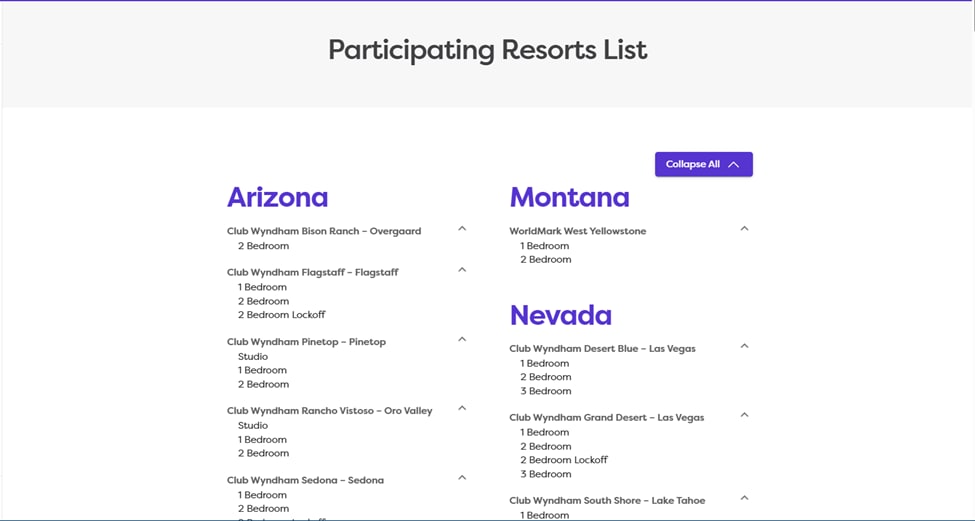
If a resort or a unit type does not appear on this list, that means it is not eligible for the VacationShare rental program. You cannot submit reservations for properties or unit types that are not listed.
Because not all properties or unit types are accepted, it is very important to check this list before booking a reservation for rental or submitting one through VacationShare. This helps ensure your reservation can be listed without delays.
When you log in to your VacationShare account, you’ll be able to see if your listing is Approved, Denied, or Canceled. At this time, rental status (whether the reservation has been rented) is not displayed in the portal.
If you’d like to know whether your listing has been rented, our team is happy to assist you. Please contact us by calling 888-965-2385 (Monday–Friday, 9 AM–7 PM EST) or by emailing info@vacationshare.com. We’ll gladly look up the rental status for you and share the most updated information.
Because rental status isn’t shown in the VacationShare portal, hosts are encouraged to reach out anytime they would like an update. Our team is always here to help clarify the status of your listing.
If your listing was rented, you will automatically receive an update 45 days after the checkout date of your listing. This allows time for stay verification and final processing. If you would like an update at any point, before or after the 45-day window, please contact us — we’re always happy to help.
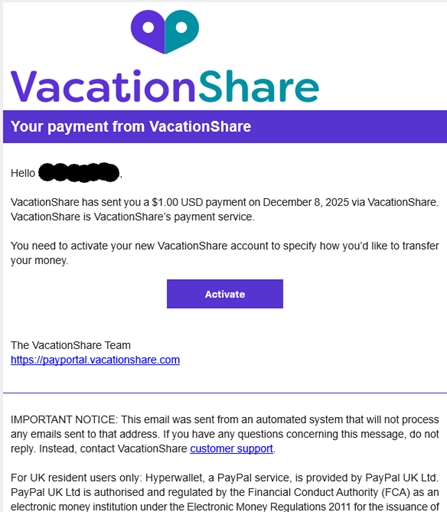
If your listing was successfully rented, you will receive two important communications:
Pay Portal Invitation – You will receive an email inviting you to create a Pay Portal account so you can access your payment based on the rental program you submitted through. This invitation comes from do.not.reply@hyperwallet.com. (You can only join the Pay Portal through this invitation.)
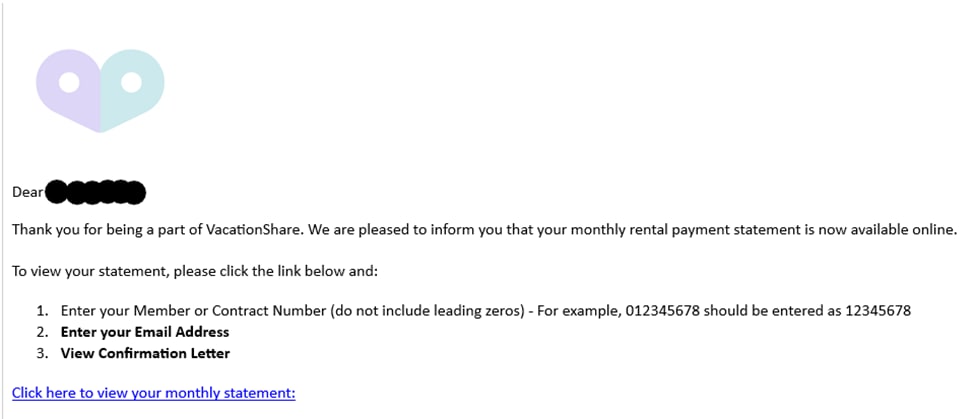
Income Statement – You will receive an income statement showing the rental activity and your earnings. This email will come from one of the following:
Go to www.vacationshare.com and log in with your email and password. Once you log in, you will automatically arrive on the My Listings page.
On the left-hand side of the My Listings page, you will see a dashboard menu. Look for the hyperlink that says Timeshare Owner Priority Reservations and click on it.

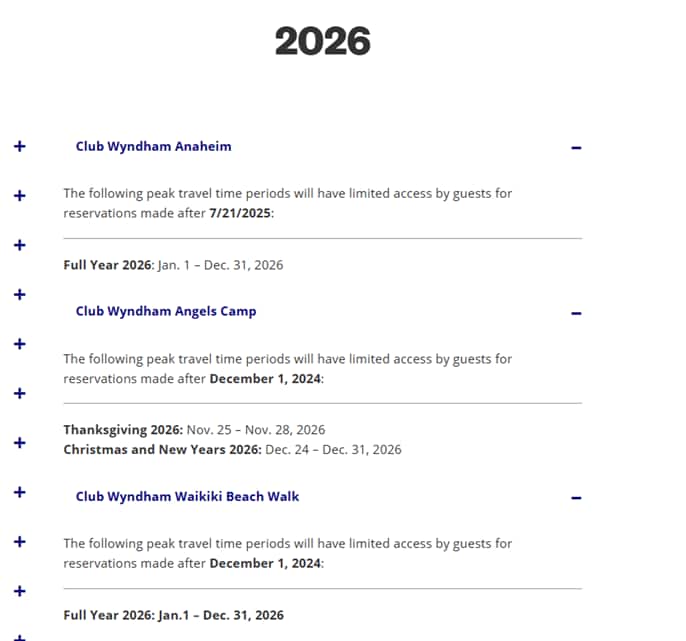
After clicking the link, you will be taken to the Club Wyndham website. Here, you will see a full list of blackout dates (also known as Owner Priority Reservations) for each resort and each date.

If your reservation falls on any of these blackout dates, you cannot submit it to VacationShare for rental. These dates are set aside strictly for owner travel only, so they are not eligible for listing.
Please make sure to review blackout dates carefully before creating a listing.
Blackout dates only apply to Club Wyndham resorts. They do not apply to WorldMark resorts.
Now you’re ready to use VacationShare to list your unused vacation time like a pro.